ETH Homepage

Add a printer (macOS)

Please note: Printing a page in color costs your chair 6 Rp/page, while a page in Black&White costs 1 Rp/page only!!

Please also have a look at print.ethz.ch There, you can make a webprint and also check your printing costs, even the environmental costs of your print activity!

In Mac OSX, you can use the utility called “ETH Printers”. If you are using a department computer, this application is already installed.

On private computers you can download the utility: ETH Printers.pkg (Signed by Houdah Software, notarized by Apple Inc.)

The installed printers are configured with the correct tray and finisher options.

Instructions

  • Start the program “ETH Printers”.

Specific printer

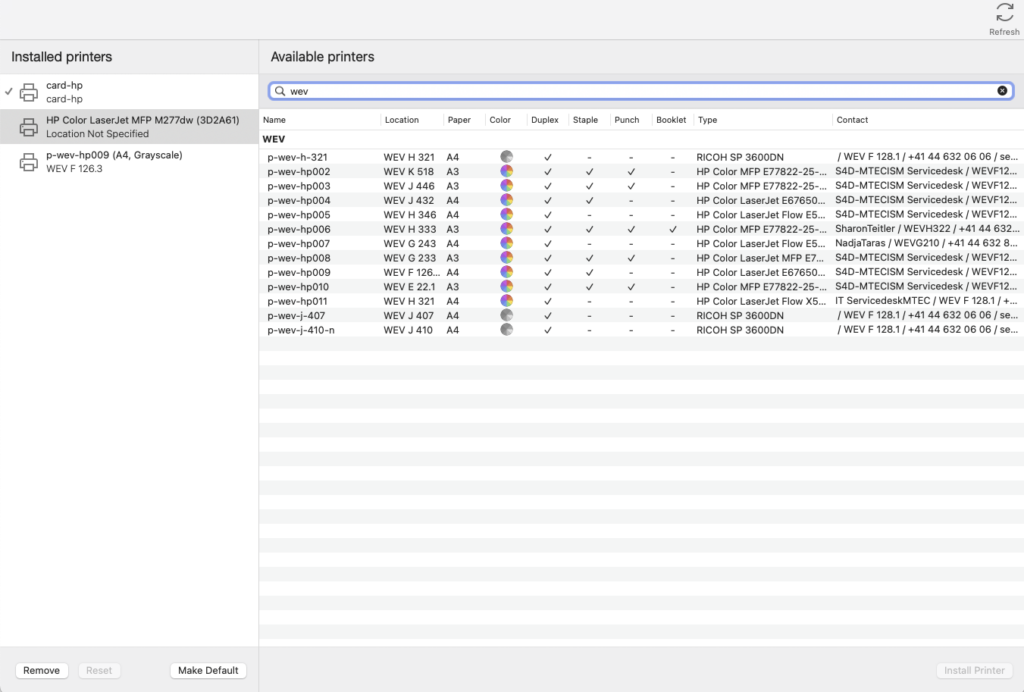
  • In the window “Available printers” you can look for the building where the printer is located.
  • Now choose the printer you want to add and click “install printer”.
  •  

Follow me printing

The “Follow me” printer card-ethz is already installed.

  • With this print queue you have a printer for the cloud printing system. You can go to any PIA printer and release your print job(s) using your ETH ID card.

For Nashuatec printers:

Default modes are: colour – black and white; no staples and no punches

Webprinting – Firefox and Safari

  • Choose below the “Orientation” in the dropdown menu “Printer Features”

In the dropdown menu of the “Feature Sets” you can set different printer options. E.g. with “Basic” you have the option to choose between color printing or black-white printing.

  • Select your prefered printing mode in the “Color Mode”.


  • To get to the options for the staples and punches, select “Finishing” instead of “Basic”
  • Select the options you wish to have for the “Staple” and/or “Punch”

If you can not select any of the options for the staples or punches, you need to add a finisher to the printer.

  • Go to the “Printers & Scanners”
  • select your preferred printer and click on the “Option & Supplies..” button

  • On the new pop-up window go to Options
  • Select the “Finisher SR3200” in the dropdown menu for the finishers and click OK. Now you should be able to select options for the staples and punches

  • In order to make a quick save of the set modes, choose in the dropdown menu right to “Presets” the option “Save Current Settings as Preset…”

  • Enter a name how you want to call this set of settings and hit “OK”.

  • Now it should appear in the dropdown menu of “Presets”.
     

Webprinting – Chrome

  • Go to the print options by pressing cmd+P. 
  • At the very bottom select “Print using system dialog” and a new window will pop up

  • Select your Presets

  • If you don’t have any presets, click on “Show Details”
  • Select “Printing Features” instead of “Layout” in the dropdown menu and proceed as normal.

Word
 

If you already set a personal preset setting you can select it in the “Preset” dropdown menu.
If not, go to the print options and select in the dropdown menu “Printer Features” instead of “Copies & Pages”.

You can proceed the same way as explained in the “Webprinting – Firefox and Safari” description.

Adobe Acrobat  Pro

  • Open the Print options and click on the “Printer” button in the bottom left corner

  • A new window pops up. Choose instead of “Layout” the “Printer Features” and proceed the same way as explained in the “Webprinting – Firefox and Sarari” description.

For Xerox printers

  • Choose “Xerox features” and you will find the details for staples and punches in the section “finishing”: